The flash drive (hard drive) asks for formatting, but there were files (data) on it. Solving the problem - Windows cannot complete formatting Why the format is changing
Situations when an unreadable RAW format appears on a computer or laptop instead of a regular partition are very unpleasant for the user. And many simply do not know what to do to bring the disk to normal condition, since the system initially does not recognize the RAW format of HDD disks. How to fix this problem? To do this, you can use several recommended tools, including Windows tools and specialized programs.
RAW format - what is it?
Some users mistakenly believe that the appearance of this format is solely due to the fact that the RAW file system appears instead of the usual one. We restore the disk by rolling back the system state to the previous state, and... the result is zero! Why?
Yes, only because the RAW format is not a file system, but rather the absence of one. This is why the operating system does not see the hard drive or logical partition (damage may also affect partition tables).
Sometimes the system can perceive a damaged HDD, but there is no information that should supposedly be present on it. That is, it is there, but it is impossible to read it. However, often when you try to access such a partition, Windows immediately displays a message about the need to format it before further use. Unfortunately, formatting does not always produce the desired effect, and information is destroyed. It will be very difficult to restore it later, although special programs can be used. But this is not the best method that allows you to convert the RAW format of HDDs. How to fix the situation with saving information? For such purposes, you should first turn to the system’s tools, which will be discussed separately.
Why is the format changing?
Among the reasons that cause the replacement of the desired format with an unreadable one, the main place is occupied by purposefully acting viruses, power surges, sudden power outages in the process of performing some system or user operations, etc.
It also happens that the system defines the hard drive as RAW, files and folders seem to be displayed, but it is impossible to do anything with them (copy, open, move, delete). In this case, you cannot even format the partition, change the volume label, or change its conditional or actual size.
RAW format of HDD disks: how to fix it using the simplest method?
The very first thing to do is to use the command console and run as administrator. You can call it from the “Run” menu (Win + R) using the cmd line.
The chkdsk command is used as a universal tool for restoring the format without data loss. Please note that if the system partition is damaged, you can only call the command line if you boot from removable media such as a LiveCD, a Windows installation disk, or from a bootable flash drive. As a rule, the combination Shift + F10 is used to open the console.

To run the command itself, you need to know the drive or partition letter (the so-called volume label). Let's say the damaged partition in the system is designated by the letter “D”. In this case, the command to be written will look like this: chkdsk d: /f. After entering it, you need to press the Enter key and wait for the file system recovery process to complete, after which you must restart the computer.
RAW format of HDD disks: instructions for using partition management tools
Windows has another powerful tool in the form of the Disk and Partition Management utility. It, along with the above command, is capable of restoring the RAW format of HDDs. How to fix the partition format using it? It's also easy. It’s just worth considering that this technique is designed exclusively for those cases when there is no data in the section.

First, through computer administration or using the diskmgmt.msc command in the Run console (Win + R), you need to call the built-in Disk Management system utility. Next, on the selected partition that has a damaged format, you should right-click and select the formatting line from the context menu.


If the system displays an error or formatting error message, in order to restore a RAW disk, initialization will first be required, followed by the creation of a simple volume. After completing these steps, formatting will be performed, and the disk or partition can be used again for your needs.
Using the TestDisk application
Interesting opportunities for recovering the HDD format are provided by the free TestDisk utility, which is designed as a portable version and does not require installation on the hard drive.

After starting the program in simulating DOS mode, you need to select the Create line, and then specify the disk that was converted to RAW format (you need to select the disk, not the partition). Next, the section style is set (this is usually done automatically).

At the next stage, select the analysis line (Analyze), press Enter, then Enter again with the Quick Search item selected.

In the analysis results, partitions for recovery will be marked in green and the letter P, while those to be deleted will remain gray with the letter D. If you need to change the attribute from P to D, arrows are used.

To continue, press the Enter key again, select the Write button from below, then use Enter again, and press Y (Yes) to confirm the action. When the conversion is complete, all that remains is to restart your computer.
MiniTool Data Recovery utility
This program is also capable of restoring the RAW format of HDD disks. You can fix it as follows.

After launching the utility, a tool called Lost Partition Recovery is selected, the RAW partition is specified, and Full Scan is activated.

At the end of the scan, all files and folders that are in the partition with the changed format will be shown. They can be copied to another location, and then formatted in the application itself, or use the methods described above for this.
According to most experts, the program is good in everything (it works quickly, reliably and stably), but it has one huge drawback - it belongs to the category of shareware applications. The limitations in the trial version include the fact that using this utility it will not be possible to recover partitions larger than 1 GB (but you can also find distributions with activators on the Internet, although their use is illegal from the point of view of international law).
Recovering partitions in DMDE
DMDE is another program for converting disks and partitions of any type from the RAW system to the normal format.

In the application, you select a physical disk with a RAW format (do not uncheck the partition display line!), which can be visually identified by underlining, color mark, size or file system, after which you need to select it and click the open volume button just below. Next, you should check the contents by clicking the show sections button. If this is exactly what is required, the restore button is then used, then the operation is confirmed, and at the end of the process the “Apply” button is pressed. To avoid errors, although this is not required, it is advisable to reboot the system.
A few final words
These are the main methods for restoring a damaged HDD format. Only the most popular tools and programs were listed here. You can find many other interesting utilities on the Internet, but all of them, as evidenced by reviews from experts and users, work on similar principles.
When changing the format on the system partition, the same methods are used, but in this case the boot is done from removable media, and the main tool is exclusively the command console or portable versions of the above-described applications (for example, TestDisk).
If, after working with an external hard drive, the device is improperly disconnected from the computer or a failure occurs during recording, the data will be damaged. Then, when you reconnect, an error message will appear asking you to format it.
When an external hard drive does not have important information, you can simply format it, thereby quickly fixing the problem. Then all damaged files will be erased, and you can continue working with the device. There are several ways to correct the error while saving important data.
Method 1: Check via the command line
You can check your hard drive for errors and fix possible problems using standard Windows tools. This same option is especially relevant if you have discovered a failed NTFS file system before RAW.
Procedure:

When the check is completed, all faulty data will be corrected, and the hard drive can be used to record and view files.
Method 2: Format the disk
If there is no important data on the hard drive, and the main task is to regain access to the device, then you can follow the advice of Windows and format it. You can do this in several ways:

After this, all files that were previously stored on the external hard drive will be deleted. You can try to recover some of the information using special software.
Method 3: Data Recovery
If the previous method did not help resolve the problem or another error appeared during the process (for example, due to a file system type mismatch), and there is important data in the device’s memory, then you can try to restore it. This can be done using special software.
We recommend choosing R-Studio for this purpose, but you can use any similar software. The program is suitable for working with external hard drives and other removable storage media. Capable of recovering data from a faulty or accidentally formatted device.
An external hard drive is a compact device that provides the ability to store copies of data and transfer large amounts of information from one device to another. The advantage of an external HDD is the use of a USB interface, which allows you to conveniently connect the device to any tablet, laptop and PC. Its remaining parameters are similar to a regular computer hard drive.
Despite the advantages of conventional hard drives, the device also has disadvantages. When working with an external HDD, users may have the following problem: the disk cannot be accessed and it needs to be formatted. Let's look at the causes of this problem and how to deal with it.
To organize and store information on any type of storage device (external hard drive, flash drive, hard drive), you need to apply a set of special rules determined by the location and method of storage. This is a specific set of software that provides access to information in a convenient form for various applications. The most popular file system now is NTFS. It is also used on external hard drives.
Damaged or missing file system
When viewing information about an external drive to which access is prohibited and if it needs to be formatted, you can see that the NTFS file system has become RAW. This indicates a missing or damaged file system on the disk. Often the data itself remains intact.
Not all users know that in addition to recorded files, there are special file identifiers on the HDD. They contain information about the file type, its size and other attributes. This method of organizing information storage can be compared with a table. There is a key and the data itself, and they can be accessed by using a specific identifier. If the key column disappears, it will be quite difficult to gain access to specific information. This occurs when the disk file system is damaged.
Options for solving the problem when the external hard drive does not open
The easiest way to return the file system to an external drive is to use the standard CHKDSK command type:
- The command line is launched (press Windows + R, enter “cmd” in the field that appears and click “Run”).
- A console will appear in which to write the command “CHKDSK disk_name: /f”. In disk_name, enter the name of the external drive that has the RAW file system.
- This method copes with minor damage to the file system. There is a risk of losing some data.
There are applications that provide file system recovery on disk. The most popular is GetDataBack. The utility recovers all data without loss.
If these two methods do not work, and the external drive still does not open and asks for formatting, then you need to format the hard drive. Quick formatting will not result in data loss. Information in the form of zeros and ones will remain on the disk, but access to it is lost. There are applications that help restore this information. Conventional formatting completely deletes information, but solves the problem with accessing the external hard drive.
Formatting using Windows
The following steps are required:
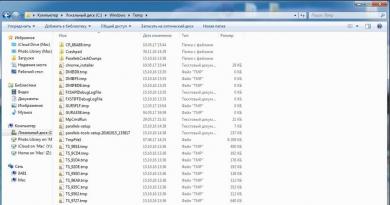
- Connect the external hard drive to your computer and open the My Computer window.
- After the system detects the hard drive and it appears in the “My Computer” window, you need to open the context menu of the external drive and select “Format”.
- A window will then open showing the disk formatting settings. Here you need to select a file system, specify the disk name and enable the quick format function.
It is better to choose the NTFS file system. FAT has a large number of limitations, and under modern conditions it has become frankly outdated. Using the Quick Format feature will create a clean file system without physically deleting files from the external drive.
If you disable the quick format feature, this process may take several hours. The volume label is optionally set. After setting the required parameters, you need to click on the “Start” button. Then a window opens with a warning about deleting all existing data on the disk being formatted. Once the formatting process is complete, the external drive will open again and be available for use.
Formatting via the command line
You can format your external hard drive using the command line. To do this, connect the disk and launch the Windows command line.
Disks are formatted using the FORMAT command. To find all the parameters that this command accepts, just enter "FORMAT /?".
To format an external hard drive, you need to run the FORMAT command with the following parameters:
- /Q – enables the quick formatting function.
- /V:MyDisk – indicates the name of the disk. You can use any other name instead of MyDisk.
- /FS:NTFS – formatting using the NTFS file system.
To format an external hard drive, you can use this summary command: FORMAT X: /FS:NTFS /V:MyDisk /Q. Here the letter X represents the name of the external drive being used. When formatting using the command line, it is important not to mix up the drives.
There are no additional warnings displayed during the disk formatting process using the command line, so you need to be careful.
Formatting via Disk Management
Windows OS has a handy tool called Disk Management. Its functions include formatting disks, creating and deleting partitions, as well as performing other operations. To access this tool, you need to open the “Run” menu and enter the command “diskmgmt.msc”.
After opening the window, the following steps are performed to format the external hard drive:
- Search for an external hard drive and open its context menu (right mouse button).
- Selecting the “Format” item in the context menu.
- The user is shown a warning about deleting all data from this disk. To start formatting, click on the “Yes” button.
External hard drives are very convenient and useful devices. If a situation arises when the external hard drive does not open and asks for formatting, then you can solve the problem yourself. Just follow the instructions given above in the article. To prevent incidents of information loss, you can copy important data to other storage media.
Formatting an HDD is an easy way to quickly delete all data stored on it and/or change the file system. Formatting is also often used for a “clean” installation of the operating system, but sometimes a problem may arise in which Windows cannot complete this procedure.
There are several situations in which it is impossible to format the drive. It all depends on when the user tries to start formatting, whether there are software or hardware errors associated with the operation of the HDD.
In other words, the reasons may lie in the inability to complete the procedure due to certain operating system parameters, as well as problems caused by the software or physical condition of the device.
Reason 1: The system disk is not formatted
The most easily solvable problem, which only beginners usually encounter: you are trying to format the HDD from which the operating system is currently running. Naturally, in operating mode, Windows (or another OS) cannot remove itself.
The solution is very simple: you need to boot from the flash drive to perform the formatting procedure.
Attention! It is recommended to perform this action before installing a new OS version. Don't forget to save the files to another drive. After formatting, you will no longer be able to boot from the operating system you were using previously.
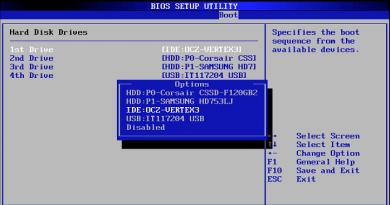
Set the BIOS to boot from a flash drive.
The next steps will be different depending on the OS you want to use. In addition, formatting can be carried out either for subsequent installation of the operating system, or without additional manipulations.
To format and then install the OS (using Windows 10 as an example):

To format without installing the OS:

Reason 2: Error: "Windows cannot complete formatting"
This error may appear when working with your main drive or second (external) HDD, for example, after a suddenly interrupted system installation. Often (but not necessarily) the hard drive format becomes RAW and in addition to this, it is not possible to format the system back to the NTFS or FAT32 file system in the standard way.
Depending on the severity of the problem, you may need to follow several steps. Therefore, let's go from simple to complex.
Step 1: Safe Mode
Due to running programs (for example, antivirus, Windows services or custom software), it is not possible to complete the started process.
- Boot Windows in Safe Mode.
- Perform formatting that is convenient for you.
Step 2: chkdsk
This built-in utility will help eliminate existing errors and cure broken blocks.

Step 3: Command Line

Step 4: System Disk Utility

Step 5: Using a Third Party Program
You can try using third-party software, since in some cases it successfully copes with formatting when standard Windows utilities refuse to do so.

Reason 3: Error: "Data error (CRC)"
This most likely indicates a physical failure of the disk, so in this case you need to replace it with a new one. If necessary, you can send it to a service center for diagnostics, but this can be financially costly.
Reason 4: Error: “The selected partition could not be formatted”
This error can generalize several problems at once. The whole difference here is in the code, which comes in square brackets after the text of the error itself. In any case, before trying to fix the problem, check the HDD for errors using the chkdsk utility. How to do this, read above in Method 2.

We looked at the main problems that arise when trying to format a hard drive in a Windows environment or when installing an operating system. We hope you found this article useful and informative. If the error has not been resolved, please tell us your situation in the comments and we will try to help resolve it.
There can be many reasons for this (incorrect shutdown, startup, wear, etc.), but the most common is errors on the disk. Out of ten similar problems, in 9 cases a standard disk error check helped. The disk error checking program is built into Windows and the command for it is Chkdsk. Let's take a closer look at it. If something is unclear, there is a video instruction at the end of the article.
Calling the command: best from the command line, i.e. Start in the find field, write CMD and press Enter. CMD is needed.

At the command line you need to enter the following: let’s say you need to check drive J: (be sure to look at which letter the faulty hard drive is), then the command will look like this:

CHKDSK space J: space /f ( chkdsk j: /f) then press Enter. Next, the system itself will check the hard drive for errors and automatically correct them. Patience, a couple of Our Fathers and our disk with important information will start automatically.
This is how you can easily save and restore important information on your own on an external hard drive that won’t open. After such cases, I recommend duplicating this information on another external medium. If suddenly your data has been restored, but not everything will help you, the article about. You can’t do anything this way, let’s go to extreme measures and