I reinstalled Windows 7 and the USB ports are not working. Why doesn't the USB port work after reinstalling Windows? Checking BIOS settings
Before use
Some USB devices, such as multifunction printers/scanners/copiers, require installation of software and USB drivers. before connecting a USB device to a computer. Always follow the installation documentation provided by the USB device manufacturer.
When troubleshooting problems with a USB device, you may need to disconnect the USB device.
Attention!Always follow the manufacturer's instructions for disconnecting USB devices from your computer. Some USB devices must be disabled and ejected before they are disconnected from the computer. Some USB devices support the Windows function Safely Removing Your Device.
Troubleshooting steps
If applicable, follow these steps to troubleshoot problems with USB devices that aren't working properly.
Disconnect ALL USB devices connected to the computer, except the USB mouse and USB keyboard (if used). These include hubs, flash drives, printers and video cameras.
After first disconnecting all USB devices, follow these steps:
When using a desktop computer Connect the malfunctioning device to one of the USB ports on the back of the computer case (ports connected directly to the system board).
When using a laptop Connect the malfunctioning device to the USB port on your laptop. Do not use a USB port splitter (such as a docking station or USB hub).
Device is not working: Leave the device connected and proceed to the next step.
If the USB device came with software that was not previously installed, install the software according to the manufacturer's instructions.
After installing the manufacturer's software, reconnect the problematic USB device and check if it works.
The device should now work properly. If the problem persists, continue to the next step.
Power supply. If the USB device is powered by a battery, make sure the battery is installed properly and is functioning properly. If the USB device is powered by an external power source, make sure all power connections are securely secured and the power cord is connected to the power source.
Check the USB connection. Sometimes, simply disconnecting and reconnecting the device to the computer is enough to solve the problem.
What happens when the device is disconnected?
The device is working properly: The problem is most likely related to the power supply or poor overall system performance.
Note.To avoid future USB device failure, follow these guidelines: Do not connect too many devices to your computer. Wait 5 seconds after connecting the device. Use hubs with autonomous power supply for connecting other devices. Do not connect USB devices when the system is busy (slower than normal).
Installing software from the USB device manufacturer: Some USB devices require installation of manufacturer's software to operate.
Microsoft Fix it: Microsoft provides a web-based application for automatic diagnosis and repair. Go to Automatically diagnose and fix USB problems in Windows (in English) and press the green button Execute. Then follow the onscreen instructions. If the device still does not work, continue to the next step.
Windows Update: Running Windows Update will check for operating system updates required for your computer. Go to Windows Update (in English) and follow the on-screen instructions to check for updates and agree to all recommended and optional driver updates. If the device still does not work, continue to the next step.
: If the USB device was previously working and then became unstable, the tool Microsoft System Restore will allow you to return to the moment when the device was still working. For more information, see Use Microsoft System Restore (Windows 7). If the device still does not work, continue to the next step.
Troubleshoot USB device problems in Device Manager: USB devices are listed in Device Manager. Follow the steps below, depending on how the device is listed in Device Manager:
Removing USB Root Hubs: Removing USB root hubs forces the system to reinstall the root hubs the next time you restart the computer. Use the steps below to remove USB root hubs:
Windows 7 does not detect USB device (device name is missing in Device Manager) – Possible problem: Power requirement
Disconnect the device and do the following until the device is detected:
The USB drive does not appear in the Safely Remove Hardware window on computers running Windows 7
If you connect a USB storage device such as a flash drive, the device may not appear in the Safely Remove Hardware window after clicking Safe removal of equipment in the Windows desktop notification area.
Rice. : Safely Remove Hardware icon on taskbar

USB storage: The USB device may not be displayed if it was previously stopped and not disconnected from the USB port. Follow these steps to show your device in the Safely Remove Hardware window:
Unplug the device, wait about 20 seconds, then plug the device back in.
The device should appear in the list in the Safely Remove Hardware window.
If your device does not appear in the list, restart your computer and repeat step 1.
Memory card in USB card reader: If the device is a memory card in a USB card reader, restarting the computer resolves this issue.
Note.Do not use Safely remove hardware icon to remove memory card. To remove a memory card, remove it using the following steps in Windows:

USB 3.0 ports stop working after Texas Instruments XHCI controller update
Incompatible update for Texas Instruments XHCI controller via Microsoft Windows Update. If your computer received this update, follow these steps to roll back the controller to the previous version.

Windows 7 stops responding or fails to transfer data when using a USB device
Data transfer may fail or Windows 7 may become unresponsive when using an EHCI (NVIDIA USB Enhanced Host Controller Interface)-enabled USB device. If your computer uses NVIDIA USB Enhanced Host Controller Interface (EHCI) chipset, download and install the hotfix from the Microsoft website. For more information, see the Microsoft Support article: Problems transferring data via USB on a computer running Windows 7 or Windows Server 2008 R2 with an NVIDIA USB EHCI chipset and at least 4 GB of RAM .
USB ports on the front of the desktop computer are not working
If there are USB ports on the front of your computer but they do not work, the cable inside the computer may have become loose. First, make sure the USB ports on the back of your computer are working by connecting a USB device to them. If your device is not recognized when connected to a port on the rear panel, follow the steps in other sections of this document to resolve the problem. Follow these steps to check if the USB ports are disconnected from the computer's motherboard:
Attention!This product contains components that may be damaged by electrostatic discharge. To reduce the likelihood of such damage, work on uncoated surfaces, use antistatic surfaces (such as conductive foam pads), and wear an antistatic wrist strap connected to a grounded surface.

I can't hear sound from a newly connected USB audio device when using Windows Media Player 11
After you connect a USB audio device and open Windows Media Player 11, your computer may not recognize the newly connected device. This may occur if your computer speakers are connected to the audio output port and a new USB audio device is connected after you press the Stop button in Windows Media Player 11 and before you press the button Playback. For example, you will only hear sound from the initially connected speakers, and not from headphones connected later.
To resolve this issue, close Windows Media Player 11 and reopen it. The player will be forced to recognize the new audio device.
No sound playback after disconnecting USB audio device
When you disconnect a USB audio device, such as headphones or a microphone, there is no sound from the speakers.
To resolve this issue, close the media player and then reopen it, or restart the computer every time you disconnect the USB audio device. Windows will force the playback pattern to be recreated and detect that the device is disconnected.
Important information regarding support for legacy USB devices
Many problems with USB devices can be resolved by disabling the option in the BIOS settings. This option may not be available on some computer models. Actions to access a parameter USB support for legacy software may vary.
Note.If your computer supports USB for legacy software using a USB keyboard or USB mouse, you must enable the option in the BIOS settings USB support for legacy software so that the keyboard and mouse can be used in MS-DOS utilities and in operating systems other than Windows. Before following these steps, make sure you have a PS/2 mouse and keyboard connected to your computer.
Follow these steps to enable or disable the setting USB support for legacy software in BIOS settings:
Turn on or restart your computer.
When the first image appears on the screen, press the F10 key in succession until the settings window appears.
Use the left and right arrow keys to navigate to the Advanced tab.
Use up and down keys to select USB support for legacy software and press Enter.
Press the Up, Down, Enter arrow keys to select Enabled or Disabled and press Enter.
Press the F10 key to save the settings and exit.
In order for the user to quickly navigate controller malfunctions, I will give a short excursion into the terminology of this issue.
USB (USB, English Universal Serial Bus) is a universal serial bus for connecting peripheral devices to a computer via a four-core cable. Using this technology, it is possible to connect devices without their own (autonomous) power supply only due to the power supplied through this bus. Everyone is familiar with these devices - external hard drives, USB flash drives, adapters, etc.
Until recently, devices were predominantly equipped with USB 2.0. The less fast and powerful USB 2.0 is gradually being replaced by USB 3.0 with data transfer speeds of up to 5 Gb/s (up to 5 Gigabit/s) and power supply through the bus of up to 1 A (1 Ampere). Recently, the USB 3.1 standard began to be implemented - progress cannot be stopped.
USB 3.0 support is not supported by default on all operating systems
In new laptops, USB 3.0 connectors are painted blue, while USB 2.0 connectors remain black. An astute and savvy user could almost immediately assume that the problem lies precisely in the new USB 3.0 standard, which has not yet been fully implemented at the software level. Those. The USB 3.0 hardware is already installed in the laptop, but the software (driver) is not yet available.
Therefore, now we can answer the main question of this article: “ Why don't USBs work in my laptop after reinstallation?". “Because there are no drivers for USB 3.0 ports in the Windows operating system!”
Which Windows OS will not work with USB 3.0?
This problem is typical for the operating systems Windows XP and Windows 7. But in Windows 8 and Windows 10 this problem practically does not occur. The reason is simple: USB 3.0 began to be implemented en masse after the release of Windows XP and Windows 7. But if in Windows XP the problem of non-working USB ports does not resolve on its own, then in Windows 7 you can try to solve the problem simply by turning on automatic updates for Windows. The system itself, based on the device ID (USB 3.0 controller ID), will recognize and install the driver, provided that the controller brand and manufacturer are “known” to Windows 7.
What if these are not USB drivers?...
It happens that a problem with USB ports is a symptom of a more complex and unpleasant breakdown. For example, this can serve as a signal of failure of the laptop motherboard chipset. More specifically, the breakdown of the south bridge. After all, it is the south bridge (I/O Controller Hub) of the laptop motherboard that is responsible for the peripherals - USB, SATA (IDE), Audio, PCI, Ithernet. Occurs due to: overheating, short circuit on the board, power supply problems, mechanical impact.
A simple test will help you check your hypothesis about the failure of the chipset: you need to select USB ports on your laptop that are colored black, i.e. USB 2.0, and check their functionality. If USB 2.0 works, but USB 3.0 does not, then the only problem is with the drivers.
How to fix the problem with USB 3.0 drivers?
For example, you installed Windows 7, and USB 3.0 did not work even after installing all the updates (drivers) from the MicroSoft website. Then there are two options: either install Windows 8/10 and at least USB 3.0 will most likely work right away, or you will have to look for drivers for the USB controller that is installed in your laptop. This will have to be done on the Internet, so you will need high-speed Internet access.
Where to find drivers for USB 3.0 (3 sources for)
- Go to the manufacturer's website and find the required driver through the search on the website. Here you will need a little experience: you need to know, first of all, what to download (there is no point in installing every driver); you need to know the exact brand of the laptop (name and alphanumeric index); Windows operating system 32 or 64 bit;
- Download any driver pack and install all the drivers using it. For example, from here - https://drp.su/ru/download.htm;
- Go to this site https://devid.drp.su/?l=ru (click the link below - I’m looking for a driver by hand) or this https://devid.info/ru and use the device ID to find, download and install the required one yourself driver

The first method from the entire list is the most preferable and, perhaps, the easiest, if everything is clear on the laptop manufacturer’s website and you have fast Internet. But sometimes you can find a whole list of USB drivers for one device and no hint as to which of these files should be downloaded and installed. Therefore, the second point with a driver pack can sometimes help much faster - if the Internet is fast (you will have to download several gigabytes of software). At the same time, you will have drivers for all occasions for your computer, laptop, netbook.

If there is no fast Internet, then it is best to carry out a clean installation (formatting the C: drive) of Windows after some preparation, i.e. creating a backup copy of files and drivers. Otherwise, you may find yourself in a situation where it is not possible to download the driver, since the network interfaces in the laptop do not work, and it is impossible to copy the driver pack from a flash drive (external drive), since the device is all USB 3.0 - and they do not work.
Immediately after installing the Windows 7 operating system, some users notice that the USB ports on their computer do not work. Let's figure out what actions need to be taken to be able to connect devices to a PC using the above protocol.
Let us immediately note that this article will talk about a specific problem after installing, reinstalling or updating Windows 7, that is, about a situation where before installing the operating system everything worked fine, but after performing the specified procedures, it stopped functioning. We will not dwell on other possible malfunctions related to the fact that the computer does not see USB devices. A separate lesson is devoted to this problem on the site.
The problem we are studying has two main causes:
- Lack of necessary drivers;
- Incorrect entries in the system registry (after upgrading Vista to Windows 7).
Method 1: USB Oblivion
This solution is suitable just in case you upgraded to Windows 7 from an earlier operating system. In this case, entries in the system registry about previous connections of USB devices may be saved, which will be incorrect in the updated OS, which will lead to problems with further connection attempts. In this case, all records of previous connections must be deleted. The easiest way to do this is using the USB Oblivion utility, which is precisely intended for this purpose.

Method 2: Microsoft USB Troubleshooter
Microsoft has its own USB troubleshooter. Unlike the previous utility, it can help not only after installing the operating system, but also in many other cases.


Method 3: DriverPack Solution
After installing Windows 7, it is possible that your computer will not be able to receive and transmit data via the USB protocol due to the lack of necessary drivers. This situation is especially common if USB 3.0 connectors are installed on a desktop PC or laptop. The fact is that Windows 7 was developed even before this standard began to be widely implemented. For this reason, the basic version of the said OS does not contain the necessary drivers immediately after installation. In this case, they need to be installed.
The easiest way to solve this problem is if you have a disk with the necessary drivers. In this case, you just need to insert it into the drive and extract the contents to your computer using the prompts that appear. The functionality of the USB ports will be restored. But what to do if you don’t have the required disk at hand? We will consider the actions that need to be taken in this situation below.
The easiest way to solve the problem is with the help of tools designed to find and install the missing drivers on your computer. One of the best applications in this class is .
- Launch the program. When activated, it will simultaneously scan the system for connected devices and detect missing drivers.
- Click on the button "Set up your computer automatically".
- After this, the program itself will create a restore point in case an error is made during the setup process or you simply want to roll back to the old settings in the future.
- After this, the procedure for installing drivers and configuring some PC parameters will be performed.
- After the procedure is completed, a message will appear that all the necessary settings have been completed and the missing drivers have been installed.
- Now you need to restart your PC. Click "Start". Next, click on the triangular icon located on the right side of the button "To finish work". Click.
- After restarting, you can check whether the USB ports are working or not.


Method 4: Manually installing drivers
The necessary drivers can also be installed without installing additional software to search for them. But this will require a little more tinkering.
- Click "Start". Sign in "Control Panel".
- Go to "System and safety".
- In the list of tools "System" click on the item "Device Manager".
- The interface will be displayed "Device Manager". The shell that opens will present a list of different types of devices that are currently connected to your desktop computer or laptop. Click on the group name "USB Controllers".
- A list of elements will open. You need to find one of the following names in the list:
- Generic USB Hub;
- USB root hub;
- USB Root Controller.
These are the types of ports. The list will most likely have one of these names, but it may appear multiple times depending on the number of USB outputs on your computer. Despite this, it is enough to perform the procedure described below with one of the identical elements, since drivers will be installed on the computer for all ports of the same type. If there are several different names of elements from the above list, then for each of them you will have to perform manipulations separately.
So, right click ( RMB) by element name and select from the list "Properties".
- A window will open in which you need to click on the name of the tab "Intelligence".
- After that in the field "Properties" select an option from the drop-down list "Equipment ID". In area "Meaning" The device ID will be displayed, that is, in our case, the USB port.
- This data must be saved. They can be written down or copied. To do the second option, just click RMB by area content "Meaning" and select from the menu "Copy".

Attention! The main thing is that after this, do not copy any more data until the operation to find the necessary drivers is completely completed. Otherwise you will simply replace the information in "Clipboard" about driver IDs with new data. If you still need to copy something else during the procedure, then first paste the data from the equipment properties window into "Notebook" or any other text editor. This way, if necessary, you can quickly copy them again.
- Now you can proceed directly to searching for the necessary drivers. Open your browser and go to one of the popular ones - DevID or DevID DriverPack. You need to enter the data that you copied in advance into the search field of the site and click on the button that starts the search.
- After this, the search results will open. Select the option that matches your operating system (in our case, Windows 7) and its bitness (32 or 64 bit), and then click on it.

If you use the DevID DriverPack service, you will need to specify the OS name and bit depth there before you start the search.
- After you have gone to the driver page, download it, unpack it from the archive if necessary, and run it on your computer, following the prompts that will be displayed on the monitor. After restarting the PC, the problematic USB ports should work. If this does not happen, then look for the origins of the problem in incorrect registry entries, as described above.


There is another option for downloading the necessary drivers - do it from the official website of the manufacturer of USB controllers that are installed on your PC. But in this case, you must definitely find out the address of this Internet resource, as well as the exact name of the controller model.
There are two main reasons why USB ports may not work after installing Windows 7, although before that they functioned normally. Firstly, these are incorrect entries in the system registry left over from the old OS, and secondly, the lack of necessary drivers. Each of these problems can be solved in several ways, which we describe in detail in this article. So, after reading the material, users can independently choose the most convenient and acceptable course of action for them.
Many of our readers asked for an explanation Why don't USB ports work? and also why the error “ Error. USB device not recognized" I finally found the time to write this long-awaited article. USB ports are not always the cause of a connected device not working.
Very often the external device itself fails, which is why the error about a faulty USB port pops up. Before moving on to the next steps, make sure that the USB device you want to connect is working (check with a friend or on another computer). If you are sure that your device works, then this article is just for you.
Causes of the problem
They may be completely different, but you need to find out the exact reason why USB ports don't work.
- If the above methods did not help and still USB ports don't work, try going to “Device Manager” and checking the “Controllers” section for devices with a yellow exclamation mark. If present, double-click on the device and read the reason for that error.

- Perhaps the USB ports are not working due to incorrectly installed drivers or their complete absence. The article will help you cope with this.
- It is possible that USB ports don't work because of the usual ones, but by installing and scanning your computer, we can find and
After successfully reinstalling the Windows operating system, some users notice that the USB ports no longer work. It often even happens that the installation process took place via a flash drive and the ports are working normally, but upon completion, the flash drive stops opening on the computer. This problem usually appears as a result of various failures in the operating system, which are quite easy to fix.
How to activate a USB connection
In this article, we will consider the option in which the USB ports previously functioned normally, that is, before reinstalling the operating system. If there was a problem with the interfaces before, then there may be many reasons that will not be considered. Also, this article will not consider those cases when the computer simply does not see the flash drive, but the ports are functioning normally.
The problem discussed in the article has the following reasons:
- Absence or incorrect installation of all necessary drivers;
- A problem with entries in the system registry that appeared after updating/reinstalling Windows;
- There is a problem with the BIOS settings. This also happens in cases of reinstalling the operating system.
Let's move on to the available ways to fix this problem.
Option 1: USB Oblivion
This solution is designed for cases where failures appeared after updating the operating system. For example, you previously had Windows 7 Home, but you decided to reinstall and upgrade to Windows 7 PRO. In such cases, entries about the connection of other USB devices that were used on the previous operating system are stored in the system registry. However, after the update, the usage records became corrupted, causing problems with future connections.
If this is your case, then deleting all records of previous connections of USB devices will help get rid of the problem. This can be done manually in the registry, but in this case the process will take a very long time, and it will also require the user to have a lot of experience interacting with the system registry. To save yourself from having to dig through the registry yourself, use the USB Oblivion program.
Before starting any manipulations in the system registry, it is recommended to create a system restore point so that in the future you can roll back changes if they lead to an even bigger error.
Instructions for using USB Oblivion are as follows:

Option 2: Microsoft USB Troubleshooter
The Windows operating system has several standard utilities built into it that can restore the functionality of certain PC components. One of these utilities works in a similar way to the one described in the method above, however, it can solve not only problems with registry entries that arose after reinstalling the operating system, but also some others.
Using this built-in tool follows the following instructions:

Option 3: DriverPack Solution
After reinstalling or updating the Windows operating system, it may be that the necessary drivers are missing from the system or were installed incorrectly. This situation occurs in cases where USB 3.0 standard connectors are installed in a computer/laptop, and Windows 7 was reinstalled. The thing is that at the time when the “seven” was being developed, USB 3.0 was not a very common format. It is because of this that problems with USB drivers may arise after reinstalling the “seven”. They need to be installed separately.
Most often, the operating system independently finds the necessary drivers on the Internet and installs them in the background, but this may take some time. You can use a special driver disk, which should usually come with your computer or operating system, if you purchased one.
But if the operating system itself was unable to update the drivers, and you don’t have a flash drive or disk with them at hand, then you can use special programs that update drivers automatically. The best solution in this case is the DriverPack Solution utility. The program interface is designed in a minimalistic style that is understandable even for an inexperienced user, plus it has a correct translation into Russian. The utility does not require installation and is distributed completely free of charge.
Instructions for updating drivers using it are as follows:
- Download the program from the official website. It will be downloaded as an EXE file that you will need to run.
- When you first launch the utility, it will scan your computer, during which it will be determined whether drivers and other components are missing for normal operation of the computer. It will take no more than a minute.
- You can use automatic computer setup, which will require almost no physical movements from you. However, it is worth considering that in such cases additional programs may be installed if DriverPack considers their installation justified. If you agree with these terms, then click on the button "Set up your computer automatically".
- The program will create "Restore point", so that you can use it in case of problems.
- Then the procedure for installing drivers and applications will begin.
- Upon completion of the procedure, you will receive a message stating that everything has been successfully installed and is ready to go. Click "Further".
- DriverPack Solution can be closed. Now you will need to restart your computer. The reboot must be done via "Start", and not through a button.
- Check if the USB connectors are working.


If you are not satisfied with the option that involves installing all the necessary and not so necessary programs in automatic mode, then you can choose a different mode. Let's look at how to work with DriverPack Solution in this case:
Option 4: Reinstall drivers manually
The required drivers can be installed using Windows itself, but this will require more time and effort. An Internet connection is also required.
The instructions for this option will look like this:
- Open "Control Panel". Depending on the operating system you are using, the process to navigate to "Control Panels" may vary. In Windows 7 you need to click on the icon "Start" and there you can choose "Control Panel".
- For convenience, place it opposite "View" meaning "Category". Parameter "View" located in the upper right part of the window.
- Now select the option "System and safety".
- Pay attention to the block "System". There you need to go to the item "Device Manager".
- The interface will open "Device Manager", where several branches will be displayed with different types of devices that are currently connected to your laptop or computer. Expand the branch "USB Controllers".
- In the list of items that open, find one of the following:
- Generic USB Hub;
- USB root hub;
- USB Root Controller.
- The list contained lists of the types of ports that are installed on the computer. One of these will most likely already be installed on your computer. The number of items with the same name will depend on the number of USB ports on your computer. The names may be repeated, there is nothing wrong with that. However, if you find several elements with different names, then for each of them in such cases you will have to install separate drivers.
- Right-click on one of the detected elements. In the context menu you need to select the option "Properties".
- At the top of the window that opens, select the tab "Intelligence".
- Now in the field "Properties" select an option "Equipment ID". In area "Meaning" The device ID will be displayed. In this case, the USB port ID.
- 11. It is recommended to save this information somewhere. It is not necessary to rewrite it, you can just copy it. To do this, right-click on the desired value and select the option from the context menu "Copy".
- The copied information can be transferred to a text file and returned to it later if the need arises. If you are too lazy to create a text document, then the copied information can be stored on the clipboard. In this case, the main thing is not to copy anything else there.
- After copying all the necessary information, go directly to the search for drivers. This can be done on one of the special sites - DevID or DevID DriverPack. Go to one of them.
- Paste the copied ID into the site search field and click "Search".
- From the search options, select the one that matches your operating system, as well as its bitness (32 or 64 bits). Download it by clicking on the title.
- If you use the service from DriverPack to search, then in addition to entering the ID device for which a driver is needed, you will have to indicate the operating system on which the computer is running, as well as its bitness.
- Download the driver and unpack the archive with it on your computer. Next, run the installation file with drivers and follow the instructions of the installation wizard. There's nothing complicated about it.
- Reboot your computer when you finish the procedure and check that the USB ports are working.


You can also try to download the driver from the official website of the controller manufacturer that is installed on your PC. However, in this case, you need to know the exact resource address and the exact name of your controller model. This search option is the most acceptable, but requires more information from the user, which makes its implementation more difficult.
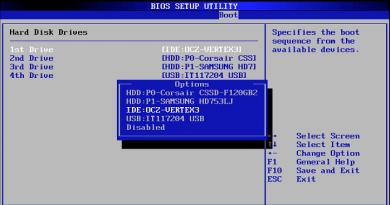
Option 5: BIOS Settings
It may also be that during the system reinstallation, the settings of the USB controllers in the BIOS were lost. In such cases, the following “symptoms” can be observed:
- USB controllers refuse to boot in the BIOS interface, but otherwise work fine;
- In the operating system, USB outputs are displayed normally, but they are not able to work with a flash drive and other devices connected to them;
- USB ports are not displayed in the operating system, nor in the interface "Conductor", neither in "Device Manager". However, they are in the design and are in working order.
In such cases, you just need to enable it in the BIOS environment. It should be understood that the BIOS interface on different computers may be different, therefore, it is very difficult to give universal instructions, so everything will be considered using one example:

This article examined all available ways to solve the problem when USB ports refuse to work normally after reinstalling/updating the operating system. It is worth understanding that if they did not work correctly before reinstallation, then it is unlikely that any of the presented methods will be able to help you.